Terms you need to know:
- Working Cords: Actively tied into knots to create the design.
- Filler Cords: Stay stationary, providing support and structure for the knots.
Lark’s Head Knot / Mounting Knot
Fold cord in half.
Loop it around a dowel or ring.
Pull the loose ends through the loop to tighten.

Cow Hitch Knot
The Cow Hitch Know is the same as the Lark’s Head Knot just done in reverse. Sometimes it’s called the Revers Lark’s Head knot.
Fold cord in half.
Loop it around the front of a dowel or ring.
Pull the loose ends through the loop to tighten.

Vertical Lark’s Head Knot

Similar to Lark’s Head but tighten each side separately for complex patterns. The Vertical Lark’s Head Knot is essentially a standard Lark’s Head Knot turned on its side, with the tightening done separately for each half. This provides a different visual effect and helps with more intricate patterns.
See a step by step video tutorial here:
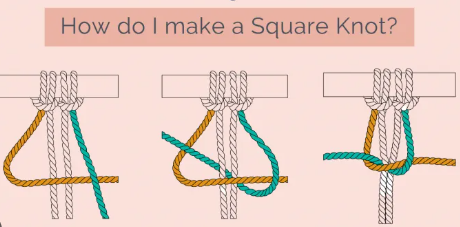
Square Knot
Use four cords: two working, two filler.
Fold left cord over fillers, loop right cord over and through and tighten.
Repeat in reverse for the second half.

See a video tutorial here:
Half Knot Spiral / Spiral Knot
A variation of the Square Knot.
Tie repeatedly in the same direction to form a twisting spiral.

The half knot spiral is a beautiful know used commonly in Macrame projects. It is the same as the square knot except you only work with one side i.e. making 4 shapes with either the left or the right working cord over and over.
-
- Start with your two working cords, which are on the outer sides.
- Take the right working cord and pass it over the left working cord.
- Now, take the left working cord and pass it under the right cord, bringing it up through the loop created by the right cord.
- Pull both working cords to tighten the knot.
- Repeat the Knot to Form a Spiral:
- Continue tying half-knots (always crossing the right cord over the left cord first, and then bringing the left cord under the right and up through the loop) in the same direction for each knot.
- The key to creating a spiral is that you must keep tying the knots in the same direction each time. This consistency is what makes the knots twist into a spiral pattern.
See a video tutorial here (this video uses the left cord as the working cord – the result will be the same):
Half-Hitch Knot

- You need 2 cords – a working cord and a filler cord.
- Position Cords: Anchor the filler cord in place. Hold the working cord in your hand.
- Make the First Knot:
- Pass the working cord over the filler cord, creating a loop.
- Bring the working cord under the filler cord and through the loop.
- Tighten the knot.
- Repeat: To continue, repeat the process—pass the working cord over, then under the filler cord, pulling through the loop each time.
Here’s a video tutorial (there are 3 examples, in the second 2 four cords are used):
Double Half-Hitch Knot

Tie two Half-Hitches together for a stronger, bolder line.
Create diagonal or vertical lines with double Half-Hitches for clean, emphasized designs.
Here’s a video tutorial:
Berry Knot

Tie three Square Knots.
Pull center cords through to create a berry shape, securing with another Square Knot.
Here’s a video tutorial:
Barrel Knot

Make a loop with a working cord and wrap it around the others, pull through the loop, and tighten for a decorative finish.
Here’s a video tutorial:
Essential Tools for Macrame:
Cord: Cotton for flexibility; jute/hemp for a rustic look.
Scissors: Sharp for neat cuts.
Tape Measure: Ensure precise measurements.
Dowel/Metal Ring: For hanging designs.
Macrame Board: Keeps your project steady.
Storage Box/Bag: Keeps your space tidy.
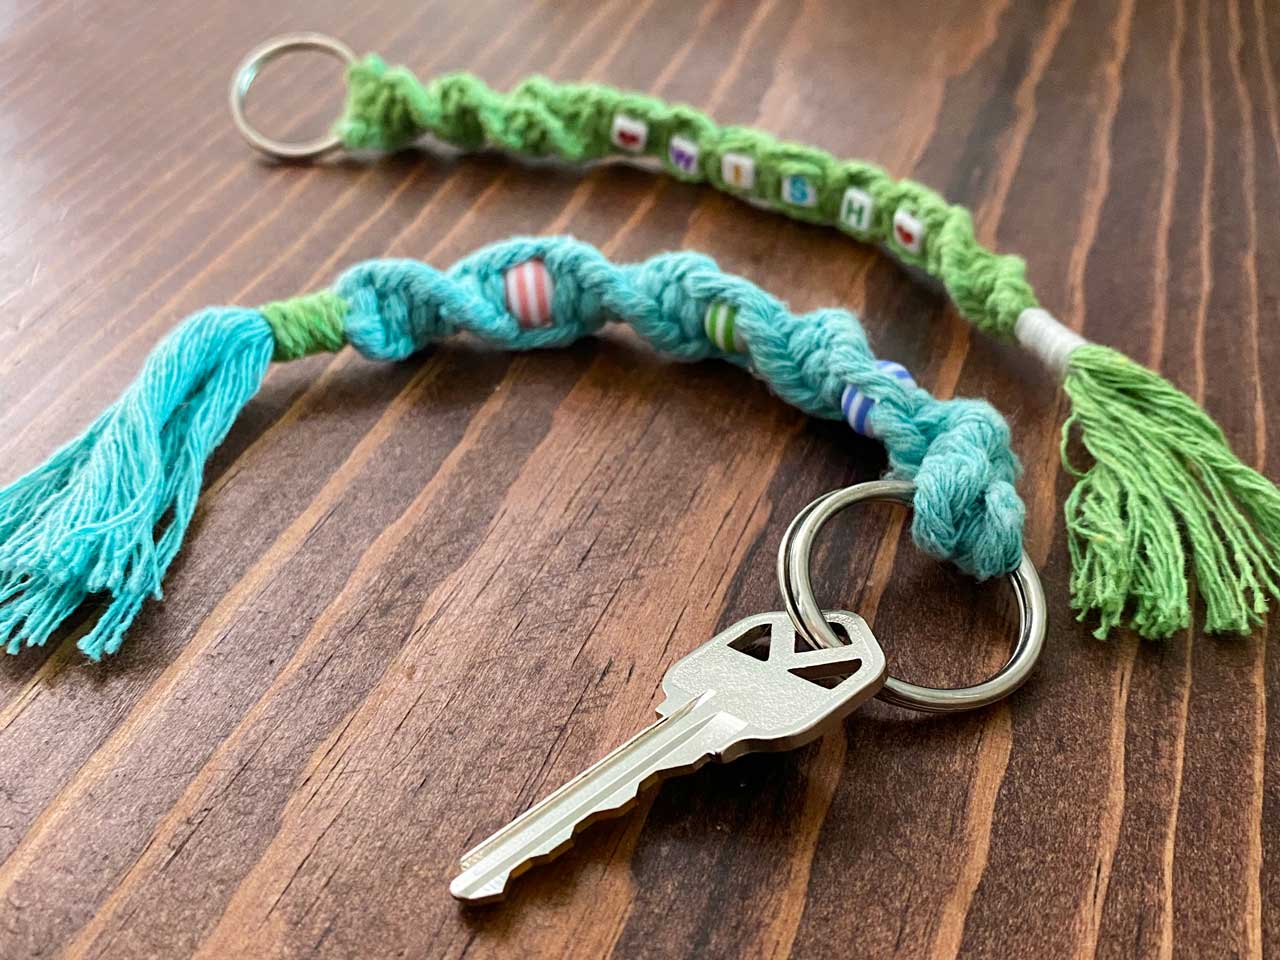
Pro Tip: Practice basic knots until they become second nature. These are the foundation for all your macrame creations, from simple keychains to intricate wall hangings!
Read next: 10 Stunning Macrame Wall Hangings to Beautify Your Home
Read next: Essential tools and materials